

Introduction: Multi-task Your Arduino


This instructable describes a method of time-slicing that creates the illusion that your arduino is performing multiple tasks at the same time.
Using this technique the arduino in the above video is simultaneously:
- toggling a LED every 300mS (milliseconds)
- scrolling a line of text every 250mS
- changing a custom bar graph every 100mS
The included arduino code is fully annotated should you wish to use this project as a template.
Step 1: Parts List and Schematic
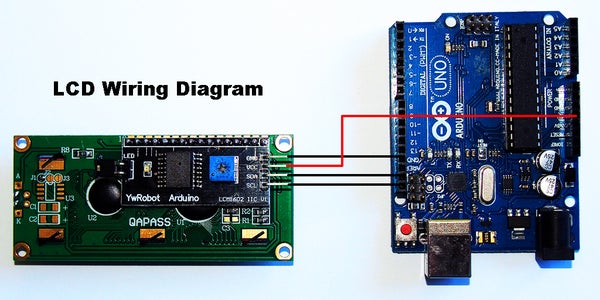
Very few parts are required to replicate this project:
- 1 x arduino Uno R3 microcontroller.
- 1 x I2C LCD 16x2 display
- 1 x arduino-to-PC USB cable
- 4 x arduino male-to-female jumper wires
All parts may be obtained from https://www.aliexpress.com/
Photo 1 shows how to connect the jumper wires.
Step 2: Code
To install my code, download the file "multitasking.ino" and insert the contents into a new arduino sketch. Save the sketch as "multitasking" (without the quotes) then upload it to your arduino.
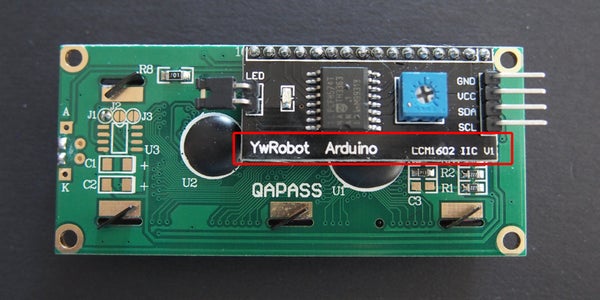
You will also need to install an I2C “library” for your LCD display. I used a library from http://arduino-info.wikispaces.com/LCD-Blue-I2C#v1 . If you have a different chipset "Google” the text located in the red area shown in photo 1.
Once you have located a suitable library download the zip file and install it using the instructions found at https://www.arduino.cc/en/Guide/Libraries.
The instruction set for most LCD displays can be found at https://www.arduino.cc/en/Reference/LiquidCrystal.
Attachments

Step 3: Theory
An empty loop(){} within your arduino code will cause the arduino to “wheel-spin” several thousand times every second. Let’s see what happens when we add a task ...
Single-tasking:
The following code will display “Hello World!” on your Serial Monitor once every second:
Serial.println(“Hello World!”);
delay(1000);
Each loop(){} now takes over 1 second to complete due to the delay(1000) instruction.
Assuming that your arduino has a 16MHz crystal, the delay(1000) instruction is wasting 16,000,000 clock cycles . Other tasks are possible if we eliminate this delay.
Multi-tasking:
Let’s rewrite the above piece of code:
if (Flag1)
{
  Serial.println(“Hello World!”);
  Flag1=false;
}
“Hello World! is printed after which the loop(){} reverts to rotating at full speed until Flag1=true.
Since the loop(){} has nothing to do, and is whizzing around at full speed, let’s add another task.
if (Flag2)
{
  digitalWrite(LED, !digitalRead(LED));
  Flag2=false;
}
This piece of code causes the LED to “toggle” after which the loop(){} again reverts to full speed until Flag2=true.
Ignoring how the flags are getting set, we are now able to perform multiple tasks in the SAME time period.
Long tasks require special coding techniques
Multitasking short tasks, such as blinking a LED, is easy ... multi-tasking long tasks, such as scrolling a text message, requires a different approach.
If you look at the video you will see lots of things happening while the text slowly scrolls across the screen. In order to create the illusion of multi-tasking, long tasks must be rewritten as a series of smaller tasks such that a different section of the code is implemented each time through the loop.
This is achieved through the use of “static” variables [1] to track how far the task has progressed. My “scrollMessage()” and “bargraph()” functions demonstrate this technique.
[1]
When a subroutine is called all “variables” forget their previous values unless they have been declared “static”, in which case the previous value is available when the subroutine is next called.
Step 4: The Task Scheduler

The secret to setting the flags is to create a 1 millisecond (mS) “heartbeat” using one of the Arduino Uno R3 timers. I chose to use Timer/Counter 2 (8-bit) which leaves Timer/Counter 1 (16-bit) free for other tasks.
1mS is achieved by dividing the 16,000,000Hz clock by 128 to obtain an 8 microsecond (uS) clock interval. If we now count these 8uS pulses and generate an interrupt when the count reaches 125 then 125*8uS (or 1mS) will have elapsed [1].
The flags are set by placing the following code in the interrupt service routine (ISR):
// ----- count the number of milliseconds that have elapsed
Counter1++;
Counter2++;

// ----- print “Hello World!”
if (Counter1 > 1000 - 1)    //1 second
{
  Counter1 = 0;
  Flag1 = true;             //the loop(){} sees this flag and prints the message
}

// ----- toggle LED
if (Counter2 > 300 - 1)     //300 milliseconds
{
  Counter2 = 0;
  Flag2 = true;             //the loop(){} sees this flag and toggles the LED
}
Once a counter reaches its target value the counter is cleared and a flag is set. The above code takes very little time to execute as there are very few instructions.
The main loop(){} sees every flag that the task scheduler sets and performs the task.
Adding additional tasks is easy... simply create an additional counter and flag, then mimic the above code.
Photo 1 shows the relationship between the three tasks that my arduino is performing.
Notice that:
- sometimes loop(){} has no tasks to perform.
- sometimes loop(){} only performs one or two tasks.
- each of the tasks is called a different number of times
- the bar graph is advanced every 100mS
- the text is scrolled every 250mS
- the LED toggles every 300mS
[1]
We actually load 125-1=124 into the “compare match register” because the interrupt doesn’t occur until the next (125th) clock pulse.
Step 5: Key Points
To successfully multi-task:
- Avoid the delay() or delayMicroseconds() functions. Instead
- create an interrupt driven “heartbeat” and
- use a task scheduler.
- Long tasks should be treated as as a series of smaller “chunks” with
- “static” variables tracking the progress.
Click here to view my other instructables.

![Tim's Mechanical Spider Leg [LU9685-20CU]](https://content.instructables.com/FFB/5R4I/LVKZ6G6R/FFB5R4ILVKZ6G6R.png?auto=webp&crop=1.2%3A1&frame=1&width=306)


